
Making A Table Saw
Miter Sled
October 2, 2018
A while back I made a crosscut sled for my new tabelsaw. Now it's time to add a miter sled to my arsenal of handy table saw accessories. I adapted a few different ideas and techniques I’ve seen over the years and put them together with a few ideas of my own to make a sled that is easier to use and gives me much better results than any miter sled I’ve used in the past. I actually feel excited about making picture frames again because I know I that my corners are going to line up perfectly from now on.
This project was supported by Acme Tools. Make sure to visit their blog and check out their list of the Top Table Saws for 2018.

Some of these are affiliate links, and I can benefit from your purchases. Some of them are just so you can easily find the stuff you need.
Tools
Back when I made my crosscut sled, I shared some of my thoughts on using the right materials to make very stable runners for shop-built jigs. At that time, I knew that I would be making a miter sled as well, so I cut extra runners for this project. Here is a link to that project if you would like to jump back and familiarize yourself with making runners.
With that formality out of the way, let’s jump into building a precise miter sled.

I put a few washers in the miter slots to hold the plastic runners up just above the surface of the tablesaw. Then layed both of the plastic runners in place.
The only material in this project other than the runners, is some ¾ inch MDF. I just cut an 18-inch section off a full sheet, then cut that again at 30 inches. The big piece makes up the base of the sled, and the leftover piece is turned into the fence. These dimensions are pretty arbitrary - you can modify this to make a sled any size you want, I just thought this would cover most of the things I needed it for.

I clamped a large speed square to the tablesaw fence to help line up the base of the sled. It’s not really important to the function of the sled to have the base be precise, but it goes a long ways toward making the miter fence precise when we get to that step later on. I nudged the tablesaw fence over until the point of the base was in-line with the saw blade, then lock it down.

With everything lined up, I used a counter sink bit to drill pilot holes through the base and into the runners. Then I drove in several screws to lock the runners in place. I used a flush trim saw to trim the runners even with the edge of the base. This isn’t exactly necessary, I just think it looks better.

At this point I am moving on to the fence. I want to point out that this technique for making a fence is not an original idea on my part. I got the idea from a video William Ng put out called “2 cuts to a “Perfect” miter sled. I’ll outline the steps here briefly, but if you want to see William’s very detailed explanation, click here.
I used my crosscut sled to make one perfect 90 degree corner. Then I set my table saw fence to 15 inches and cut the two opposite edges down to size. This left me with a perfect square.

Next I set my fence to 3 inches and cut most of the way along one side, then I flipped the board over did the same thing to the perpendicular edge. I moved over to the bandsaw to finish the cuts and was left with an L-shaped piece that had a perfect 90 degree point.

Back at the sled base, I drew a reference line that would be perpendicular to the saw blade. Then I lined up a scrap piece that had a perfectly straight edge and screwed one side down. I grabbed my biggest square and referenced it off the tablesaw fence then pivoted the scrap piece and screwed down the other end once it was perfectly square.

I put the back points of the miter fence up against the scrap piece and lined the front point up with the leading point of the base. I screwed the fence to the base temporarily, knowing that I would be fine tuning it in a minute.

I made a test piece that had a perfect 90 degree corner, then I cut that corner off and carefully labeled all the important components. I measured both sides of my new triangle, and that would tell me exactly how far away from perfect my fence was.
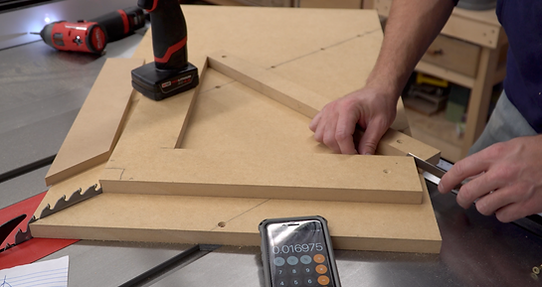
Over the short length of this little triangle, the difference between the two sides is only .005. This tells me that I did a really good job lining everything up from the start, and it many cases this would be good enough. I decided to challenge myself and strive for an even smaller error, so I used William’s formula, found here, to figure out precisely how far I needed to move my fence in order for it to be perfect. After a little struggling, I got mine exactly right.

I made a little test frame to see how well it worked and man, those miters joints are far superior to anything I have been able to achieve up until now. So I put a few more screws in the fence to lock it in place for good.

At this point the sled could be ready for use, but I am going to make a few more improvements. I styled the base this way because I wanted one long side that would allow me to temporarily attach stop blocks. This way I could cut exact repeatable lengths up to nearly 30 inches if I wanted. However, leaving the base as this massive rectangle causes a problem - the whole sled is very back heavy and wants to tip off the infeed side of the tablesaw. Most of the base is now just unnecessary real estate that ends up being a bunch of dead weight, so I used a jigsaw to cut away all the fat that isn’t essential to the function of the sled.

Lastly, I used some remnants of a length of sandpaper from my drum sander to glue down to the base. This way workpieces have something to grip onto instead of trying to slide around on the bare MDF surface.
This miter sled is now complete. There are certainly more bells and whistles that could be added to it, and after using it for a while I’ll decided if I need any of them. I can say without a doubt that this sled is easier to use and gives me much better results than any miter sled I’ve used in the past. I actually feel excited about making picture frames again because I know I that my corners are going to line up perfectly from now on.