
Double Flip-Top Workbench
Storage Upgrade (Part 2 of 2)
February 12, 2018
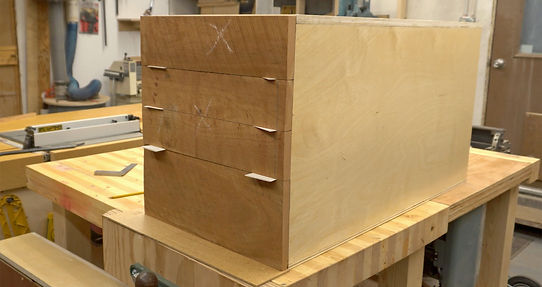
In my last video I started building the storage cabinets for my flip-top workbench. In this video, I’m going to finish the project by making and installing the drawer fronts, installing handle hardware and mounting the cabinets into the workbench.

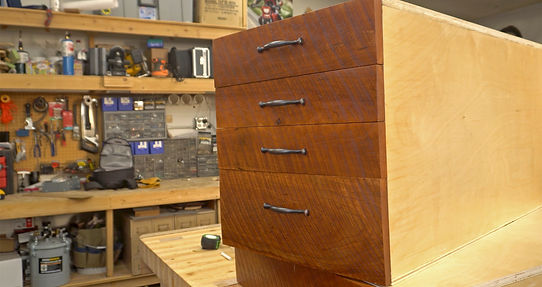
These rough-sawn cherry boards came out of a stack of lumber in my Grandpa’s basement that had been there since long before I was born. They clearly came off of a circular blade style sawmill, and I really like the curving sawtooth lines in them.
I want to try and preserve the saw marks in the finished product, but I’m not sure how it’s going to look when I’m done - so I’m going to start by only doing one drawer from start to finish to make sure I like the look of it, before I hack up all these great old boards.
Some of these are affiliate links, and I can benefit from your purchases. Some of them are just so you can easily find the stuff you need.
-
Jointer
-
Radial Arm Saw
Materials
-
Rough Sawn Cherry
-
Drawer Handles
Tools


I used one of the old cabinet doors from my dining room remodel project to act as a flat sled, then I used shims to keep the workpiece from rocking around and used hot glue to temporarily lock it in place.

This is the widest board that I will be using and it won’t quite fit through my planer - that’s why I’m using the drum sander this time. It will be slower, but I will end up with the same result.
It took many passes because the drum sander takes off much less material per pass than a planer can, but eventually I got the job done. I popped the board off the sled, and tested it against my table to make sure it was flat.

I squared one edge at the jointer, then used the table saw to rip it to final width and length (using a crosscut sled).

In order to save the sawmarks, but still have a smooth surface, I sanded the board lightly with 80, 120 and/then 220 grit paper.

I wiped on one coat of fast drying polyurethane. This way I could see what the finished drawer face would look like. When the rest of the faces get caught up, I can easily add another coat to this one.

At this point I have my proof of concept, and I really like the results, so I am going to proceed with the rest of the drawers. I cut the rest of the boards to rough length to start getting them caught up to the first one.

I drew a straight reference line down one edge of each of the boards then cut them on the bandsaw. This step serves 2 purposes: it makes the boards fit through my narrow planer, and it eliminates one live edge so they will be easier to square on the jointer.

Once again, I flattened each board, this time by running a sled through the planer which was much faster, then I squared the edges on the jointer.

I ripped the face for the bottom drawer to width, then squared up one end, but left the board longer than it needed to be. I put a small spacer on my workbench to create some clearance, then set the face up against the cabinet to check the fit. It looks like I must have something a bit out of square, so I marked the corner that needs to be trimmed.

Using a shim between the board and the fence of my radial arm saw, I trimmed the board at a slight angle. Then, I checked the fit against the side of the cabinet again, this time it was perfect.

On the opposite side, I marked the board where it needed to be cut in order to match up exactly with the edge of the cabinet. Then I used a square to transfer that mark around to the front side where I will be able to see it.

This end is still a rough cut from the circular saw, so I squared it up to give me a good place to start, but left lots of space between this first cut, and my mark.

Then I checked that square end against the side of the cabinet and found that it was slightly askew, just like the other side was. So I marked the corner that needed to be trimmed and went back to the radial arm saw.

At this point it was just a matter of trimming the angle, checking the fit, then adjusting the shims and trying again until I had the board and the cabinet fitting just right. Once I knew what combination of shims it took to cut the perfect angle, I made one more cut right up to the line to get my final length.
The remaining drawer faces got cut to size the same way. First I determined the width of the next face, then cut it to size. I used a small stack of notecards between each face to make sure that each drawer had enough clearance to open and close without getting hung up on each other.

I sanded all the boards using the same process and grit progression I did with the test board. Because of the deep gouges left by the sawmill, I also took this time to erase any pencil or chalk marks that the sander couldn’t reach.
I used compressed air to blow all the dust out of the deep saw marks then walked away for a while to let the dust clear out of the air before I started putting finish on.

I put the first coat of finish on fairly thick so that it could flow into all the nooks and crannies. I was a little surprised to see all the bubbles forming in the brushing process. I figured it couldn’t be dust because I took care of that. Maybe it was the cheap brush I was using. Either way, they all popped as the poly dried so it wasn’t an issue. I followed the instructions on the can and lightly sanded with 220 grit before putting on the second coat.

With the second coat of finish dry, it was time to mount the faces to the drawer bodies. Starting at the bottom, I made sure that the edges we lined up perfectly with the sides of the cabinet, then carefully clamped the face to the drawer so as to avoid scratching the new finish.
I slid the drawer out to make it easier to access, and ran some short screws through the drawer and into the face from the back side to hold it in place.

With the first one in place, it was time for some more repetition. Put the next face in place, clamp it down, run in the screws and check the fit.

The top drawer was a little different because there was no way to get clamps on it. To get around this, I put a bunch of hot glue on the drawer then set the face in place and held it there while the glue hardened. Then I was able to carefully open the drawer and put on a clamp to make sure it couldn’t move while I drove in some screws.

Next, it was time to install the handles. To do this, I just had to mark where exact center was on the drawers, then I could line up this jig I made with that mark and and drill perfectly spaced holes. This jig made it really easy to get all of the handles lined up in the center, and spaced out vertically in every drawer.

The screws that came with the handles were too short to go all the way through, so I just used a ½ inch forstner bit to drill through the drawer body which allowed the screws to stick through just enough. I also could have gone and bought some longer screws to solve this, but hardware stores aren’t open at 10:30 at night and I wasn’t willing to wait.

It’s finally time to put the cabinets into the workbench. I started with the shorter one, and my brother helped me line it up and slide it into place underneath the flipping portion of the bench. It was a tight fit, but it came out exactly like I wanted.

We slid the main cabinet into the bench, then put in all the drawers so we could fine-tune it’s position and make sure that everything had enough clearance to open and close freely.
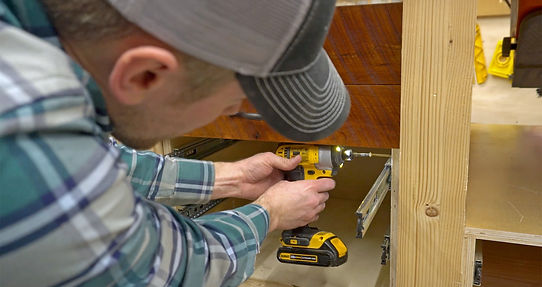
With everything working smoothly, I fastened the cabinet body to the bench by running screws through the bottom, and through the sides into the legs.

For one last finishing touch, I had taken a section from one of the live-edge cut-offs and sanded and finished it alongside all the drawer faces. Then I used CA glue to hold it to the side of the cabinet while I checked for drawer clearance. With everything working nicely, I added a few brad nails for good measure. I think it makes a nice transition piece going from the rougher drawer faces to the smooth cabinet wall.